Last updated November 17, 2026



Free written scope consultation - allowances, timeline, and change-order rules on paper before a single trade is scheduled
Driveway & Pavers Warning Signs Every Homeowner Should Know
A paver that rocks under your foot is not a nuisance. It is a message. Somewhere below that one stone, the base has begun to move, the bedding sand has washed out, or groundwater is pushing up after a heavy rain. In our experience across Homestead, that single wobbling paver shows up six to twelve months before the failure turns expensive. Read it early and you’re looking at a few hundred dollars of reset work. Ignore it and you’re looking at base replacement across the whole field. This guide walks you through a 30-minute inspection you can run yourself, the five warning signs that matter most, and what South Florida storms leave behind that a dry-day look never catches.
Quick Answer
The main warning signs your driveway pavers are failing are rocking stones, sunken or heaved sections, weeds pushing up through joints, sand washing out at the edges, and poly-sand or joint sand disappearing after storms. Any one of these means the base under the pavers has shifted, settled, or lost drainage capacity. Early signs usually mean a targeted repair of $150-$600; advanced signs mean the base has to come up and go back down, which runs into the thousands.
Styles & brands we work with
- Kitchen remodeling
- Bathroom remodeling
- Home additions & ADU
- Roofing
- Windows & doors
- Driveway & pavers
- Fence
Table of Contents
- The 30-Minute Homeowner Inspection
- Rocking vs. Settled Pavers: What Each One Tells You
- Why Weeds in the Joints Are a Drainage Warning
- Spotting Edge-Restraint Failure Before It Spreads
- The Post-Storm Checklist for South Florida Driveways
- Joint Sand and Poly-Sand Loss: The Quiet Failure
- Standing Water and Slope Failures
- When It’s Time to Call a Professional
The 30-Minute Homeowner Inspection
You don’t need tools to do this. You need a dry day, a broom, and a willingness to walk your driveway slowly. Run this inspection once in spring and once in fall, and again within 48 hours of any named storm. In Homestead, where summer rain comes hard and fast, the fall inspection catches the most.
Here’s the full sequence, in order:
- Clear the surface. Sweep the whole driveway and blow out the joints with a leaf blower on low. You can’t see what’s under a layer of leaf litter and blown-in grass clippings.
- Walk the perimeter first. Start at the garage apron and follow the outer edge all the way around. The edge is where failures usually start because that’s where the restraint sits.
- Walk the field in a grid pattern. From one side to the other, then top to bottom. Slow enough that your foot registers any stone that shifts even a sixteenth of an inch.
- Press the corners of every paver you can reach. A paver that rocks under a toe press is a different problem from one that rocks under a full step. Note both.
- Look straight down the plane of the driveway. Crouch at one end and sight along the surface. Waves show up that you’d never see standing up.
- Check for ponding. After a rain, mark any spot where water sits more than an hour with a piece of sidewalk chalk. Those spots are base problems, not surface problems.
- Probe the joints. Stick a screwdriver into a joint between pavers near the edge of your driveway. If it sinks three inches before it hits anything solid, the joint sand has eroded and water is going straight through.
The whole walk takes about half an hour, and it will tell you more about your driveway than any photo you could text us. If you’re on a Homestead property with mature oak trees or a lot that backs up to a canal, do the walk twice a year without fail. Water and roots are the two biggest movers of paver bases in this part of the county.
Rocking vs. Settled Pavers: What Each One Tells You
Homeowners tend to lump all movement together as “loose pavers,” but rocking and settling are two completely different failures, and they carry different urgency.
What rocking tells you
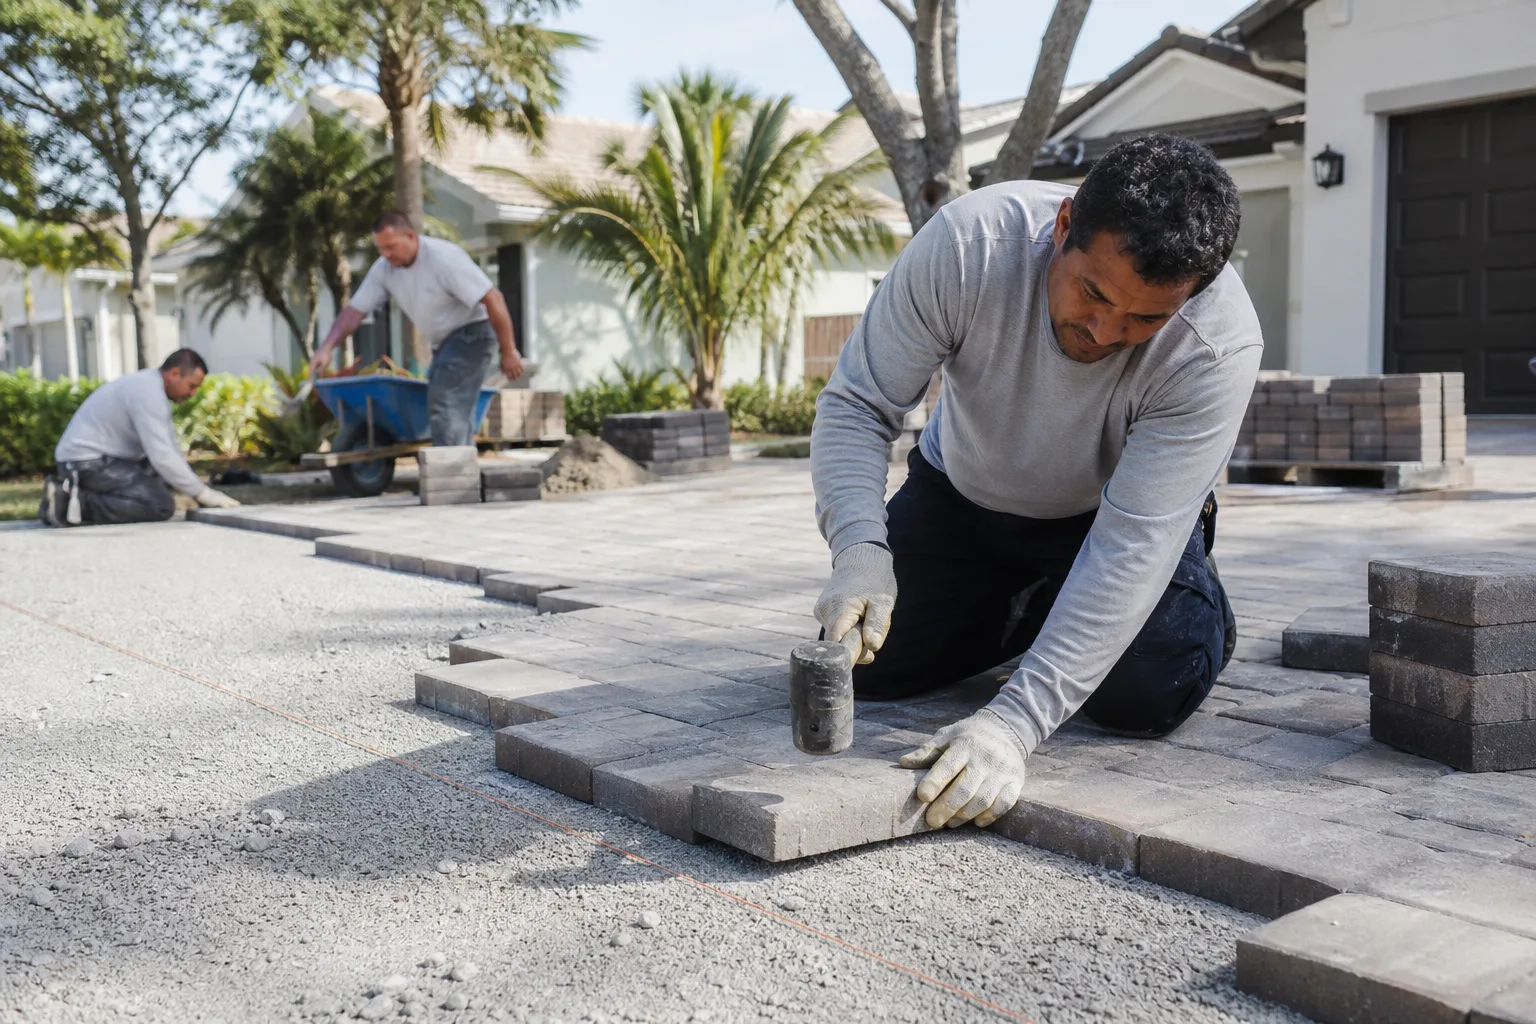
A rocking paver pivots on a hard point under the stone. That point is usually a compacted lump of base, a piece of construction debris, or a root that has grown up under the sand bed. The base under the paver isn’t uniformly supported, so the stone teeter-totters on whatever is holding it up. Rocking stones are usually the first warning sign of a problem that has already started. If you can rock it with your hand, it’s already lost its bedding. Left alone, the paver eventually cracks from flexing. Urgency: moderate. Get it reset within a season, or you’re likely to see neighbors join it.
What settled pavers tell you
A settled paver sits lower than its neighbors, with no rocking. That means the base under it has compacted further or washed out. On a driveway less than five years old, settling means the base wasn’t compacted in lifts as it should have been. On an older driveway, it usually means water has been running under the pavers for years. Urgency: higher. Settling spreads. The hollow under that one stone becomes a sinkhole the first time your car tire loads it.
Run your hand across the top of the stones in both cases. If a paver rocks AND sits low, you have both failures in one spot and the repair is not a simple reset. That’s the point where you want a professional look. Our Driveway & Pavers in Homestead team can usually tell from a five-minute walk whether you’re looking at a spot repair or an area rebuild.
Why Weeds in the Joints Are a Drainage Warning
The standard advice is to pull the weeds and move on. That misses the point. Weed growth in paver joints is a signal that three things have gone wrong at once.
- The joint sand is gone. Joint sand is what locks the pavers together and keeps water from pouring through the surface. When it disappears, weed seeds drop in and find soil. That’s the first sign.
- The bedding sand is moving. If weeds root deeply, they’re finding moisture and dirt under the pavers. That moisture got there through a base that isn’t draining right.
- The base is holding water. A properly built paver base sheds water toward the edges or a drain. A failing base traps it. Weeds love a base that holds water.
In Homestead, we see this most in driveways on the west side of town where lots meet older agricultural soil. That soil holds moisture differently than the fill used on newer lots in developments, and joint sand breaks down faster under it. When you pull weeds, look at what’s underneath. If you find black soil where you expected to find clean sand, water is getting through and staying there.
The fix is not weed killer. It’s re-sanding the joints with the right material and then checking that water has somewhere to go. That’s a two-hour job in most driveways, and it’s the cheapest repair you’ll ever do on pavers.
Spotting Edge-Restraint Failure Before It Spreads
The edge restraint is the invisible hero of your driveway. It’s a concrete curb or aluminum channel that runs along the outside edge of the pavers and stops them from spreading outward. When it fails, the whole field moves.
The warning signs to look for around the perimeter of your driveway:
- A visible gap between the pavers and the curb. More than a quarter inch of daylight between the edge stone and the restraint means the field is already pushing out.
- Loose or missing spikes. The restraint is held down by steel spikes. If they’ve backed out or rusted through, the edge will migrate.
- Crumbling grout or concrete behind the curb. That crumbling is what water uses to get under the edge and hold the base.
- Pavers sliding into the grass. Even a few pavers tipped forward slightly at the edge mean the restraint isn’t doing its job.
- A snowplow line or vehicle rut running parallel to the edge. On a driveway, tires drop into a spreading edge and deepen the rut every day.
Edge failure is urgent because a field of pavers that spreads creates a domino effect. Every stone from the edge inward loses its interlock over time. A restraint reset is a modest repair. A full rebuild because the edge wasn’t caught is not. If your Homestead driveway has a swale or a canal-side lot, look at the edges more often than the middle, because that’s where saturation works on the base first.
The Post-Storm Checklist for South Florida Driveways
A South Florida rain event does a different kind of inspecting than a dry walk. Water finds the low spots, lifts what isn’t locked down, and leaves silt in places that should be clean sand. Here’s what we look for after a storm, in order.
- Standing water more than an hour after the rain stops. Any pond that doesn’t drain within an hour is failing the slope test. Mark it.
- Silt and sand piles along the edges and downhill slopes. Sand that has washed out from the joints is a direct sign that joint sand is short.
- Heaving pavers. If a paver looks pushed up rather than sunk, it means water pressure under the base, not settling. Heaved pavers are often the most urgent repair.
- New weeds in the joints within two weeks. That’s seed dispersal from the storm, and it means the joints lost their sealant or their sand.
- Mud or darker finish on the paver surface. Mud spots show where water sat and pulled soil up through the joints.
- Washout at the driveway apron and garage slab. The apron is where the driveway meets the garage floor. Any gap larger than a pencil width at that seam is a water entry point.
- Movement on the outer edge. Re-run the edge inspection. Storms tend to be the moment a marginal restraint gives way.
One Homestead-specific detail: after a heavy rain, driveways on the east side of town that slope toward the coast can show ponding in the first few rows even when the rest of the driveway is fine. That’s not always a base failure. It’s often slope-and-grade near the street. In that case, the fix runs off the driveway and onto the grading.
Joint Sand and Poly-Sand Loss: The Quiet Failure
Joint sand is the quietest failure in paver driveways because you can’t see it leaving. It gets blown out by wind, washed out by rain, and buried under daily foot traffic. By the time the joints look empty, the pavers have been moving against each other for a while.
Two ways to check in under five minutes:
- The screwdriver test. Push a screwdriver straight down into a joint near the middle of your driveway. It should hit solid sand within an inch. More than two inches and the joints are running on empty.
- The eyeball test on the surface. Look at the joints in direct sunlight. A properly filled joint is flush or nearly flush with the paver surface. A failing joint looks like a dark slot.
The right fix is re-sanding with the appropriate material for your driveway, generally either a stabilized joint sand or a polymeric sand that sets up firm after wetting. On a clay-heavy Homestead lot, polymeric sand is the more durable choice because it holds up against the summer rain cycle better. If the pavers weren’t installed with a joint sand spec in writing, that’s the moment to have someone look at the whole driveway before you spend the money twice. Any time we install pavers, the joint material spec is on the contract in writing, because we’ve seen too many driveways get an unspecified fill sand from a contractor cutting corners.
Standing Water and Slope Failures
Water is the single most common cause of paver failure. Not traffic, not plant growth, not tree roots. Water. It gets under the base, loosens compaction, and pushes pavers up or pulls them down. Every warning sign in this guide traces back to water moving somewhere it should not. If you notice standing water more than an hour after a Homestead rainstorm, don’t wait for the driveway to fail. That pond is treating the base like a sponge. Small, early slope corrections are cheap. Letting ponding run its course across a season means the whole base needs to come up. The fix, when it’s time, usually involves re-grading the surface away from the house, sometimes adding a channel drain at the low edge, and re-establishing the base compaction.
Common Mistakes to Avoid
- Pulling weeds and calling it fixed. Pulling the weed removes the symptom, not the wet base. Untreated joints refill with weeds within weeks, especially after Homestead’s wet season.
- Pressure-washing a failing driveway. High-pressure water resets all the joint sand and drives water deeper under the pavers. On a driveway with any movement, pressure washing turns a small repair into a base rebuild.
- Filling low spots with sand. A buried low spot is a hollow. Sand sinks into it and the problem gets worse. The paver needs to come up.
- Replacing just the cracked paver. A cracked paver is usually a symptom of a base problem on one side of it. Replace the stone and it cracks again in a season.
- Assuming a paver driveway needs zero maintenance. Joint sand maintenance every three to five years in Homestead is normal, not a sign of bad installation.
- Ignoring the driveway apron. A failing apron looks like a garage problem some days. It’s usually driveway water getting in and not getting out.
- Hiring on the phone without a written scope. The bid you see in the rearview mirror is usually different from the one you agreed to. On paver repair especially, jointer size, base material, and compactor type all need to be in the scope.
See the difference
 Before
 After
 Before
 After
 Before
 After
When to Call a Professional
You want a professional look when any of these come up: a paver rocking under a full step (not just a toe press), any ponding more than one hour after rain, a visible gap between pavers and the edge restraint, water pooling at the apron seam, a paver that heaved after a storm, or a joint more than two inches deep that you can’t fill from the surface. Those are the signs the base has started to move, and the difference between a targeted repair and a full rebuild comes down to how early someone looks. Barrett & Sons Construction Homestead offers free estimates in Homestead. Call (866) 344-6796 to schedule.
Frequently Asked Questions
Most early repairs in Homestead run $150 to $600, depending on how many stones need resetting and whether joint sand replacement is needed. A base repair under a small area runs $600 to $1,500. A full base rebuild across a driveway runs into the thousands and reflects how many square feet come up. The free estimate will give you a line-item breakdown in writing. Call (866) 344-6796 for an exact quote – estimates are free.
No, not without your written approval. Every scope, allowance, and price change on a Barrett & Sons job comes to you as a written change order before the work moves. An allowance that isn’t on paper is a surprise waiting for a date. If a paver repair reveals more damage under the base, you’ll get the change in writing before anyone keeps going. Call (866) 344-6796 to schedule your free estimate.
Yes. A rocking paver means the base under it isn’t supported uniformly, which is usually water-driven or compaction-driven. Even when only one stone is moving today, the surrounding base is likely compromised and will show up within a season. Getting it looked at in the first six months is the difference between a $200 fix and a base repair.
Some weed growth is normal, but persistent weeds mean the joint sand is gone and the base is holding water. Pulling them will not fix it. Re-sanding the joints with the right material after correcting the drainage is the only lasting fix. If weeds regrow within a month of re-sanding, the base is the real problem.
Every three to five years is a common cycle for a Homestead driveway with normal rain exposure. Driveways within a half mile of a canal or draining swale may need it more often, on a two-to-three-year cycle. The screwdriver test is the simplest check – if you can push a screwdriver two inches into a joint, it’s due.
Yes for a full driveway replacement or a change to the impervious surface area, usually through the city’s building or engineering department. Small spot repairs to pavers generally do not require a permit. Any contractor doing permitted work should pull the permits and show you the signed inspection before the job closes. Barrett & Sons pulls permits and signs inspections on every eligible job. Call (866) 344-6796 to ask what your specific driveway needs.
The Bottom Line
Every expensive driveway repair starts as a cheap one. A rocking paver, a weed in a joint, a little ponding after a storm, a gap at the edge restraint – each of these is a six-to-twelve-month warning before the base fails. Do the 30-minute walk twice a year, mark your ponding spots, and re-run the checklist after every heavy rain. If you catch the signs early, the repair stays small. If you catch them late, the base has to come up. Barrett & Sons Construction Homestead has spent the last 29 years helping Homestead homeowners read those signs before they become a rebuild, and the 90-Day Done Right Promise applies to every repair we do. Call (866) 344-6796 when it’s time to look at your driveway. Our team will give you a written estimate, free of charge.
For driveway projects that run beyond a repair, our parent service page on Driveway & Pavers in Homestead covers installation, base build, and updated material options like Belgard and Techo-Bloc. If you’re thinking past the driveway into your property line, our Fence Installation in Homestead page covers paver-adjacent retaining work. And if the driveway is part of a larger site project, our Home Additions & ADU in Homestead team can coordinate the driveway into the site plan. You can see everything we do on the Barrett & Sons Construction Homestead home page.
Written by the team at Barrett & Sons Construction Homestead.